

Export a Pixelate Asset
1
Check the Preview
The Preview shows exactly what Export writes. Check each view and clip.
2
Click Export
Export is the button at the top of the Pixelate Asset Inspector. A progress bar shows each sheet being captured. Click Cancel to stop; nothing is changed on disk.
3
Find the files
When the export is done, a message under the button lists what was written, for example
Exported 4 textures and 4 animation clips to the Output folder., and the first sprite sheet is highlighted in the Project window. The Console has the full list of files.What Export writes
Sprite sheets are unlit unless the Lighting effect’s Export Lit Sprites is on. Everything else in the Style Profile (palette, dithering, lines, cleanup) is baked into the sheets.
File layout
For the UnityChan sample (File NamePlayer, clips Run and Jump, views Right and Left), Export writes:
Static (for example Chest/Static/Chest_Static_SW.png), and a particle system uses Particles (Particles_0, Particles_1 and so on with several seed variations).
How sheets are imported
Every sheet is imported as a sprite sheet that’s ready to use, so you don’t need to touch its import settings:- Texture Type Sprite, Sprite Mode Multiple, sliced on a fixed grid: one sprite per frame, named
{Sheet}_0,{Sheet}_1and so on, left to right and top to bottom. - Every frame of a sheet has the same size and the same pivot, so sprites never jitter between frames.
- Pixels Per Unit comes from the Style Profile’s Profile Settings.
- Filter Mode is Point when the profile’s Pixelated option is on (the default), Bilinear otherwise.
- No compression, no mipmaps, Clamp wrap mode, alpha used as transparency.
Output settings
The Output section of the Pixelate Asset Inspector decides where files go, how they are named and what else Export creates.
New Pixelate Assets take their Output Folder, File Name Pattern, Pivot, Create Animation Clips and Overwrite Existing from the project defaults in Settings. Existing assets keep their own values.
Output Folder
- Click the field to choose a folder. It must be inside your project’s
Assetsfolder. - Right-click the field for Choose Folder… and Use Same Folder as This Asset, which clears the field.
- The grey line under the file name fields shows the exact folder, for example
Exports to Assets/Characters/Player/. Hover it for the full path when it’s shortened.
Assets/Exports, a new asset named Chest gets the Output Folder Assets/Exports/Chest. It is filled in as a real folder when the asset is created, so it doesn’t change if you rename the asset later. That gives each asset its own folder, even when two assets share a File Name.
You can also type {Asset} in the Output Folder yourself. It stands for the Pixelate Asset’s name and is resolved when you export.
Exports always stay inside Assets. On Windows, a path longer than 259 characters is refused with an error; use a shorter Output Folder or File Name.
File names
File Name Pattern builds each sheet’s file name from four tokens:
The pattern must contain
{Clip} and {View}, so every sheet gets its own file. Leave it empty to use the default, {File}_{Clip}_{View}. The field applies your change when you press Enter or click away. Normal maps add the Lighting effect’s Normal Map Suffix (_N by default), and .png is added for you.
Examples for the UnityChan sample (Pixelate Asset UnityChan, File Name Player, clip Run, view Right):
The pattern changes only file names. Folders are always
{Output Folder}/{File Name}/{Clip}/. Animation Clips take the name of their sheet. A pattern with an unknown token, a stray brace, a character that isn’t allowed in file names, or a period at the end shows an error until you fix it.
Pivot

To see the pivot, turn on Show Pivot in the Preview’s gear menu. To start new assets with a different pivot, set Default Pivot in Settings.
Animation Clips, Animator Controller and Sprite Library
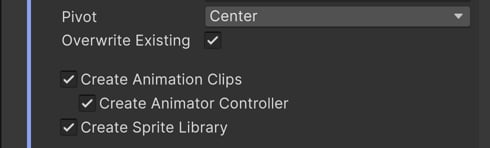
Create Animation Clips
Create Animation Clips
Shown when the asset is animated: a particle system, or a model or prefab with at least one clip. Export writes one
.anim per sheet, next to it and named like it. The clip changes the Sprite of a SpriteRenderer on the same GameObject as the Animator, one frame at a time at the clip’s FPS. It loops when the source clip has Loop Time on (for particles, when the first Particle System has Looping on).Export again to update the clips in place. References to them, and curves or events you added, stay intact.Create Animator Controller
Create Animator Controller
Shown under Create Animation Clips while it’s on and the asset has more than one clip (or seed variation) or more than one camera view. Export writes
{File Name}.controller:- With one view: one state per clip, named after the clip, in the Base Layer.
- With several views: one sub-state machine per view, named after its Label, each with a state per clip.
- The first clip of the first view is the default state. No parameters or transitions are added, so you can wire them up for your game.
Create Sprite Library
Create Sprite Library
Shown only when the 2D Animation package is installed. Export writes
{File Name}_SpriteLibrary.asset. Each sheet becomes a category named {Clip}_{View} (for example Run_Right) and each frame a label (0, 1, 2, …), so a Sprite Resolver can switch direction by category and frame by label.Export again to update the categories. Frames past the new frame count are removed, and categories you added are kept.Normal maps for 2D lights
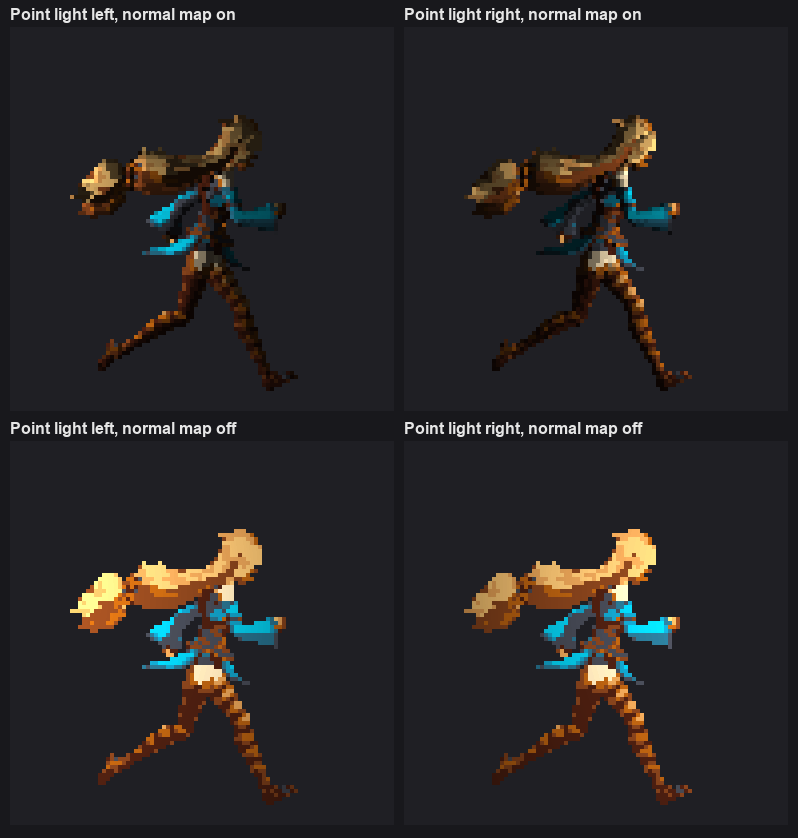
When the Style Profile has a Lighting effect with Export Normal Map on, Export also writes a normal map for every sheet into aNormals folder, named with the effect’s Normal Map Suffix. Each normal map is linked to its sprite sheet as the _NormalMap secondary texture, so sprites react to URP 2D Lights with no extra setup.
Re-export and outdated assets
Export again whenever you change the asset, its Style Profile or its source. What happens to earlier files depends on Overwrite Existing:- On (the default): sheets, Animation Clips, the Animator Controller and the Sprite Library are updated in place. Their GUIDs stay the same, so everything that uses them keeps working.
- Off: Export leaves earlier files alone and writes new ones with a number, such as
Player_Run_Right_1.pngandPlayer_1.controller.
Export many assets at once
To export several Pixelate Assets, open the Pixelate Browser, select them (or filter the list by Status to show only outdated ones) and click Export in the info strip, or right-click and choose Export. The assets export one after another with a progress bar:- Click Cancel or press Esc to stop after the current asset. Assets already exported stay exported.
- If one asset fails, the others still export, and a list shows what failed and why.
Use the output in your game
1
Add a sprite to the scene
Expand an exported sheet in the Project window and drag its first sprite into the Scene or Hierarchy. Unity creates a GameObject with a Sprite Renderer.
2
Add an Animator
Add an Animator component to the same GameObject and assign the exported
.controller to Controller. Without a generated controller, drag an exported .anim onto the GameObject in the Hierarchy, and Unity creates a controller for you.3
Press Play
The default state plays. To switch clips or directions, add parameters and transitions in the Animator window, or call
Animator.Play from a script, for example animator.Play("Base Layer.Right.Run") for the Run state in the Right view’s sub-state machine.- Crisp pixels: use the same Pixels Per Unit in your game’s other 2D art, and a Pixel Perfect Camera set to that value.
- Left and right: a side-scroller can export one side only and flip the sprite with the Sprite Renderer’s Flip X. See Typical setups.
- Swap directions with the Sprite Library: add a Sprite Library component with the exported library and a Sprite Resolver on the sprite, then pick the category (
Run_Right) and label (frame). - 2D lights: with URP’s 2D Renderer, sprites with exported normal maps use them automatically under 2D Lights. See Lighting.
Next steps
Settings
Set the export defaults for new Pixelate Assets.
Pixelate Browser
Find outdated assets and export many at once.