

Views
The Views list sits at the top of the Rendering section of the Pixelate Asset Inspector. Every view has two settings:
A new asset starts with one view, Front, at rotation (0, 180, 0).
- Click + to add a view (named
View 2,View 3and so on, at rotation 0, 0, 0) and − to remove the selected one. Drag the handle on the left to reorder. - Selecting a view in the list shows it in the Preview, and picking a view in the Preview’s view menu selects it in the list.
- The first view is the one thumbnails show, and the default state of a generated Animator Controller belongs to it.
Duplicate names
Each view needs its own name, because the name keeps its sheets, clips and Sprite Library categories apart. If two views share a name, a warning under the list says which ones. Until you rename one, Export and Save GIF add a number to the later one, such asRight_2.
Add Directions
Add Directions, in the header of the Views list, adds evenly spaced views around the source in one step:
New views use the tilt (Rotation X) of the first view in the list, so set the first view’s tilt before you add directions.
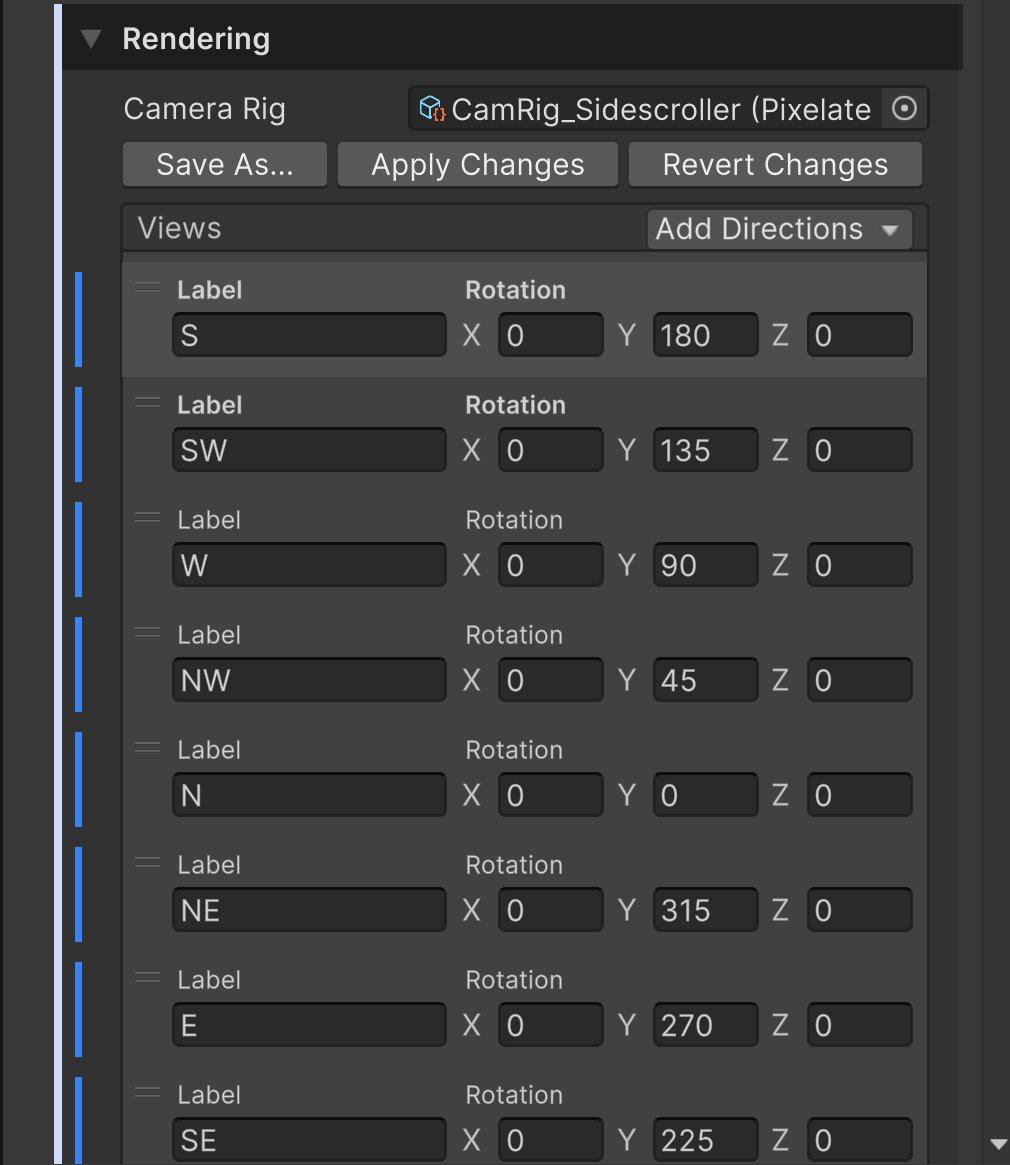
The labels name the way the character faces on screen, like a map with north up: S faces the viewer (Y 180), W faces screen left (Y 90), N faces away (Y 0) and E faces screen right (Y 270).
If the list already has views, a dialog asks what to do:
- Replace swaps the whole list for the new directions.
- Append adds only the directions the list doesn’t have yet. It’s offered only when some are missing. A direction is skipped when a view already has its name (ignoring case) or its angle, so you never get two views with the same name.
Typical setups
Share views with a Camera Rig asset
Views live on the Pixelate Asset by default. To use the same views on many assets, for example every 8-direction character, save them as a Camera Rig asset and link it. Edit the rig once and every linked asset follows.Link a Camera Rig
Use the Camera Rig field above the Views list:- Drag in or pick a rig to link it. The rig’s views replace the asset’s views.
- Clear the field (select it and press Delete, or pick None) to unlink. The views stay on the asset, now as its own.
The ⋮ menu
The ⋮ button next to the Camera Rig field has three commands:Changes on a linked rig
With a rig linked, you can still edit the views on one asset. Your edits stay local to that asset until you choose Apply Changes:- A blue bar at the left of a view marks a view that differs from the rig. The Label or Rotation caption turns bold when that value differs.
- Changing a label or rotation keeps the rest of the view linked: if someone later changes the rig, this asset keeps your value and takes the rest.
- Adding, removing or reordering views, including with Add Directions, makes the whole list local, and every view gets the blue bar. The Camera Rig asset itself doesn’t change. Choose Apply Changes to share the new list, or Revert Changes to follow the rig again.
Edit a Camera Rig asset
Select a Camera Rig asset to edit it in the Inspector. It has the same Views list as a Pixelate Asset, with Add Directions, +, − and drag to reorder, and the same warning for duplicate names. Changes reach every Pixelate Asset that links the rig, except values those assets changed locally. Create a new rig with Assets > Create > Pixelate > Pixelate Camera Rig. It starts with one Front view. You can also create one from the Camera Rigs tab of the Pixelate Browser, which shows every rig as a ring of its views seen from above.Sample Camera Rigs
The_Samples/Camera Rigs folder has four rigs you can link or copy:
Default Camera Rig
To start every new Pixelate Asset with the same views, set Default Camera Rig under New Pixelate Assets in Settings. New assets link that rig and copy its views. Existing assets don’t change.Next steps
Animation and particles
Choose the clips each view captures.
Export
See how views end up in file names, clips and controllers.