> ## Documentation Index
> Fetch the complete documentation index at: https://docs.pixelatestudio.tomblack.ca/llms.txt
> Use this file to discover all available pages before exploring further.
# Preview
> Check the exact export output in the Inspector preview: views, clips, draw modes and Save GIF.
When you select a Pixelate Asset, its Preview appears at the bottom of the Inspector, like the preview of a texture or model. It shows exactly what Export writes, at the real sprite resolution, scaled up with sharp pixels.
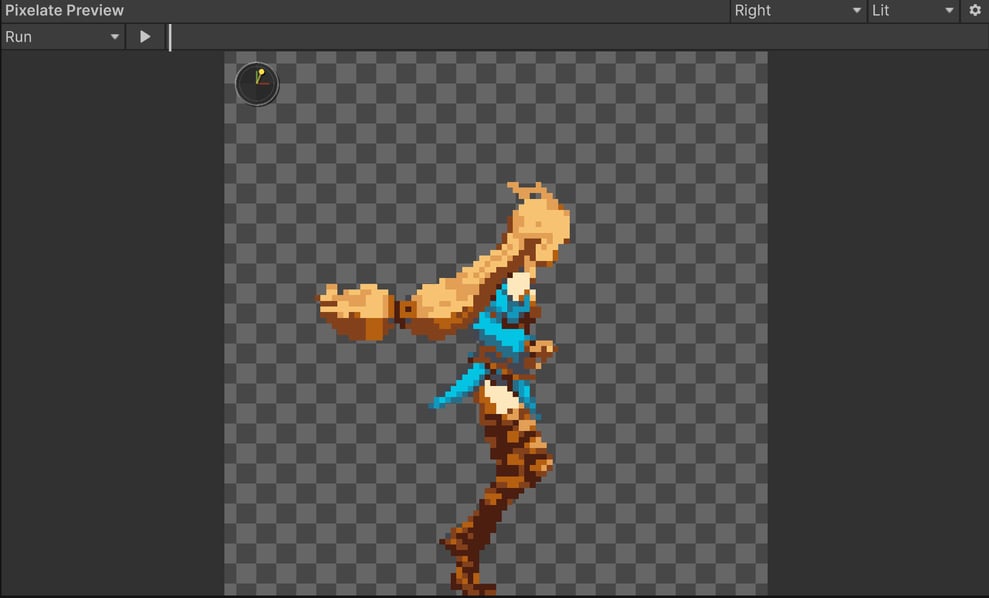 The Preview needs a Source and a Style Profile. If one is missing, it says which.
## Toolbar
| Control | What it does |
| - | - |
| **Clip menu** | Picks the clip to show. Particle assets show **Particles**, still sources show **Static**. |
| **Play / Pause** | Plays the clip at its FPS. |
| **Frame bar** | Drag to scrub through the frames. |
| **View menu** | Picks the camera view, for example `S` or `Right`. |
| **Draw mode** | **Lit**, **Unlit** or **Normal**. |
| **Gear menu** | **Save GIF**, **Show Directional Light Gizmo**, **Refresh Current Preview** and **Clear Preview Cache**. |
## Draw modes
* **Unlit:** the sprite's colors with every effect except lighting. This is what Export writes unless Lighting's **Export Lit Sprites** is on.
* **Lit:** the same, with the [Lighting](/effects/lighting) effect's lights applied.
* **Normal:** the captured normals, the same data the exported normal maps come from.
Lit and Normal need an enabled Lighting effect on the Style Profile.
## Updating
Changing an effect updates the Preview right away. Changing something that affects the capture, such as the Source, Cell Size, a view or a clip, recaptures it, which can take a moment for long clips.
If the Preview ever looks out of date, use **Refresh Current Preview** in the gear menu. **Clear Preview Cache** frees the memory used by cached previews.
Very large sprites (over 2048 px on a side) can't be previewed. The Output line under Cell Size then reads **(preview too large)**. Lower Cell Size or Pixels Per Unit.
## Save GIF
Share an animation without leaving Unity. In the gear menu, choose **Save GIF** and a scale: **1x (Actual Size)**, **2x** or **4x**.
The Preview needs a Source and a Style Profile. If one is missing, it says which.
## Toolbar
| Control | What it does |
| - | - |
| **Clip menu** | Picks the clip to show. Particle assets show **Particles**, still sources show **Static**. |
| **Play / Pause** | Plays the clip at its FPS. |
| **Frame bar** | Drag to scrub through the frames. |
| **View menu** | Picks the camera view, for example `S` or `Right`. |
| **Draw mode** | **Lit**, **Unlit** or **Normal**. |
| **Gear menu** | **Save GIF**, **Show Directional Light Gizmo**, **Refresh Current Preview** and **Clear Preview Cache**. |
## Draw modes
* **Unlit:** the sprite's colors with every effect except lighting. This is what Export writes unless Lighting's **Export Lit Sprites** is on.
* **Lit:** the same, with the [Lighting](/effects/lighting) effect's lights applied.
* **Normal:** the captured normals, the same data the exported normal maps come from.
Lit and Normal need an enabled Lighting effect on the Style Profile.
## Updating
Changing an effect updates the Preview right away. Changing something that affects the capture, such as the Source, Cell Size, a view or a clip, recaptures it, which can take a moment for long clips.
If the Preview ever looks out of date, use **Refresh Current Preview** in the gear menu. **Clear Preview Cache** frees the memory used by cached previews.
Very large sprites (over 2048 px on a side) can't be previewed. The Output line under Cell Size then reads **(preview too large)**. Lower Cell Size or Pixels Per Unit.
## Save GIF
Share an animation without leaving Unity. In the gear menu, choose **Save GIF** and a scale: **1x (Actual Size)**, **2x** or **4x**.
 * The GIF shows exactly what the Preview shows: the current view, clip and draw mode, every frame at the clip's FPS, looping.
* Transparent pixels stay transparent. With a Color Palette the colors are exact.
* The save dialog opens in the Output Folder with a name like `Knight_Run_E.gif`. You can save it anywhere, including outside the project. A GIF saved inside `Assets` is imported and highlighted in the Project window.
GIF timing uses whole hundredths of a second, so single frames can differ by 0.01 s while the total length stays right. Clips faster than 50 FPS play at 50 FPS in the GIF.
This documentation is built and hosted on [Mintlify](https://mintlify.com), a developer documentation platform.
* The GIF shows exactly what the Preview shows: the current view, clip and draw mode, every frame at the clip's FPS, looping.
* Transparent pixels stay transparent. With a Color Palette the colors are exact.
* The save dialog opens in the Output Folder with a name like `Knight_Run_E.gif`. You can save it anywhere, including outside the project. A GIF saved inside `Assets` is imported and highlighted in the Project window.
GIF timing uses whole hundredths of a second, so single frames can differ by 0.01 s while the total length stays right. Clips faster than 50 FPS play at 50 FPS in the GIF.
This documentation is built and hosted on [Mintlify](https://mintlify.com), a developer documentation platform.