> ## Documentation Index
> Fetch the complete documentation index at: https://docs.pixelatestudio.tomblack.ca/llms.txt
> Use this file to discover all available pages before exploring further.
# Camera Rigs
> Set up camera views, add 4, 8 or 16 directions at once, and share views with Camera Rigs.
Each camera view of a Pixelate Asset exports its own sprite sheets: one side view for a platformer, eight directions for a top-down game. This page shows how to set up views, add directions in one click, and share the same views across many assets with a Camera Rig asset.
## Views
The **Views** list sits at the top of the **Rendering** section of the Pixelate Asset Inspector. Every view has two settings:
| Setting | What it does |
| - | - |
| **Label** | The view's name. It is used in exported file names (for example `Player_Run_Right.png`), Animator Controller sub-state machines, Sprite Library categories and the Preview's view menu. |
| **Rotation** | The camera angle in degrees. **X** tilts the camera down toward the source: 0 looks straight ahead, 30 looks down at a top-down angle. **Y** orbits the camera around the source: 180 looks at the source's front, 0 at its back, 90 and 270 at its sides. **Z** rolls the camera and is usually 0. |
A new asset starts with one view, **Front**, at rotation (0, 180, 0).
* Click **+** to add a view (named `View 2`, `View 3` and so on, at rotation 0, 0, 0) and **−** to remove the selected one. Drag the handle on the left to reorder.
* Selecting a view in the list shows it in the [Preview](/guides/preview), and picking a view in the Preview's view menu selects it in the list.
* The first view is the one thumbnails show, and the default state of a generated Animator Controller belongs to it.
The capture camera is orthographic: the view's rotation changes the angle, never the size. The source stays centered on the **Camera Offset** in every view, so views orbit the same point. See [Framing](/guides/pixelate-asset#framing-cell-size-and-camera-offset).
Pixelate Pro assumes your source faces **+Z**, Unity's forward direction, which is how most models import. If the Front view shows the back of your model, its forward axis points the other way: rotate the view's Y by 180, or fix the model's rotation in a prefab.
### Duplicate names
Each view needs its own name, because the name keeps its sheets, clips and Sprite Library categories apart. If two views share a name, a warning under the list says which ones. Until you rename one, Export and Save GIF add a number to the later one, such as `Right_2`.
## Add Directions
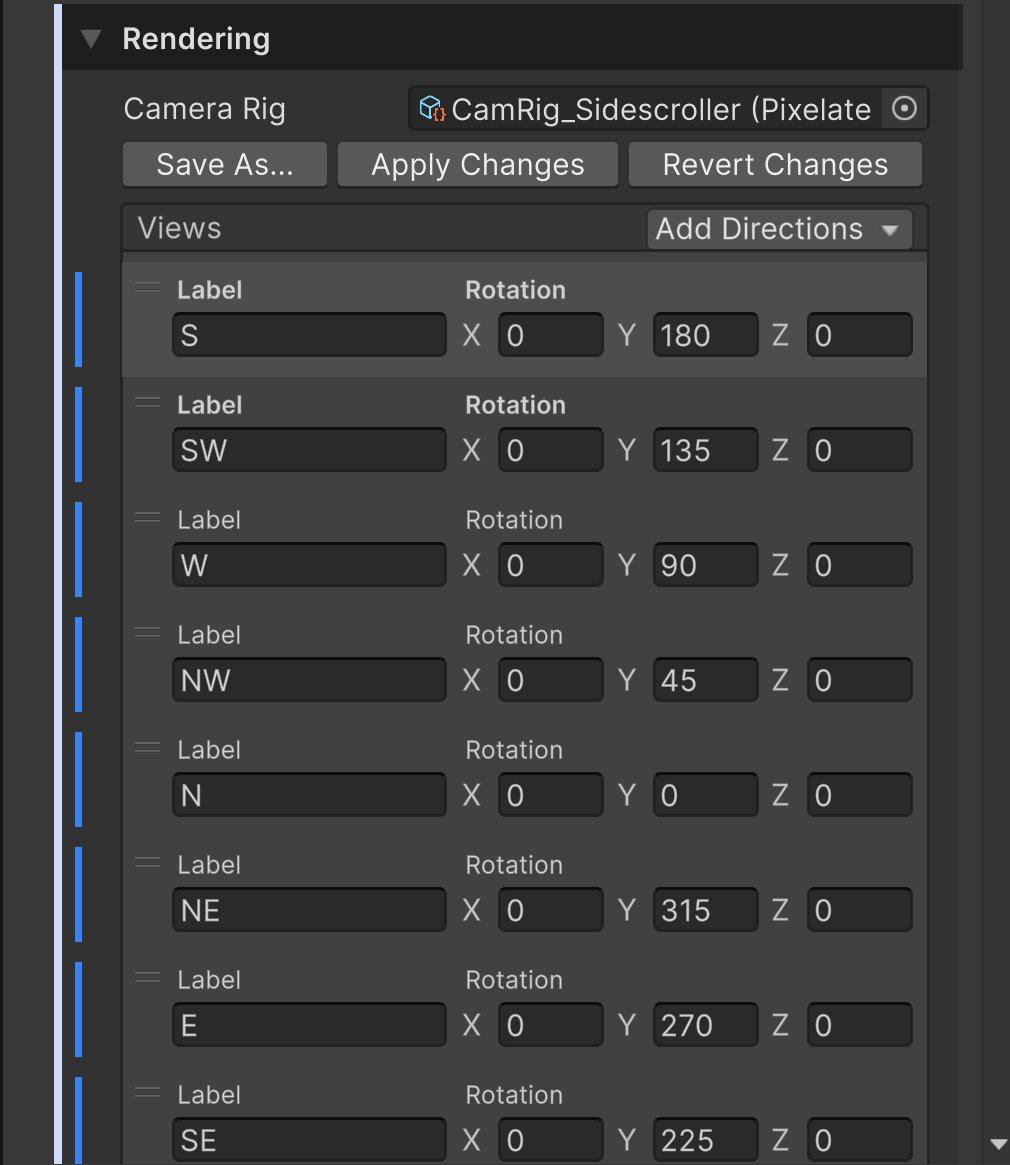
**Add Directions**, in the header of the Views list, adds evenly spaced views around the source in one step:
| Choice | Views added, in order | Step |
| - | - | - |
| **4 Directions** | S, W, N, E | 90° |
| **8 Directions** | S, SW, W, NW, N, NE, E, SE | 45° |
| **16 Directions** | S, SSW, SW, WSW, W, WNW, NW, NNW, N, NNE, NE, ENE, E, ESE, SE, SSE | 22.5° |
New views use the tilt (**Rotation X**) of the first view in the list, so set the first view's tilt before you add directions.
The labels name the way the character faces on screen, like a map with north up: **S** faces the viewer (Y 180), **W** faces screen left (Y 90), **N** faces away (Y 0) and **E** faces screen right (Y 270).
If the list already has views, a dialog asks what to do:
* **Replace** swaps the whole list for the new directions.
* **Append** adds only the directions the list doesn't have yet. It's offered only when some are missing. A direction is skipped when a view already has its name (ignoring case) or its angle, so you never get two views with the same name.
The change is one Undo step. In a narrow Inspector the button reads **Add**.
 ## Typical setups
| Game style | Views (Label: Rotation X, Y, Z) | Notes |
| - | - | - |
| Single view (props, icons, effects) | Front: 0, 180, 0 | The default. For a prop seen from above, tilt X to 30. |
| Side-scroller | Right: 0, 270, 0 and Left: 0, 90, 0 | Same as the **CamRig\_Sidescroller** sample. To save texture memory, export only Right and flip the sprite in your game with the SpriteRenderer's **Flip X**. Keep both views if the lighting or the model isn't symmetrical. |
| Top-down, 4 directions | S: 30, 180, 0 · W: 30, 90, 0 · N: 30, 0, 0 · E: 30, 270, 0 | Set the first view's X to 30, then **Add Directions > 4 Directions** with Replace. Use X 45 to 60 for a steeper view. |
| Top-down, 8 directions | S, SW, W, NW, N, NE, E, SE at X 30; Y 180, 135, 90, 45, 0, 315, 270, 225 | Same as the **CamRig\_TopDown8** sample. |
| Isometric, 4 diagonals | SW: 30, 135, 0 · NW: 30, 45, 0 · NE: 30, 315, 0 · SE: 30, 225, 0 | X 30 gives the 2:1 look common in pixel art; use 35.26 for true isometric. For 8 directions, add the 8 Directions preset at X 30. |
## Share views with a Camera Rig asset
Views live on the Pixelate Asset by default. To use the same views on many assets, for example every 8-direction character, save them as a **Camera Rig** asset and link it. Edit the rig once and every linked asset follows.
### Link a Camera Rig
Use the **Camera Rig** field above the Views list:
* **Drag in or pick a rig** to link it. The rig's views replace the asset's views.
* **Clear the field** (select it and press **Delete**, or pick **None**) to unlink. The views stay on the asset, now as its own.
### The ⋮ menu
The **⋮** button next to the Camera Rig field has three commands:
| Command | What it does | Available |
| - | - | - |
| **Save As...** | Saves the current views as a new Camera Rig asset (named `{Asset} Camera Rig` by default, in a folder you choose) and links it. | Always |
| **Apply Changes** | Writes this asset's changed views back into the linked rig. Every asset that uses the rig gets them. | When a rig is linked and you changed its views here |
| **Revert Changes** | Throws away this asset's changes and returns to the rig's views. | When a rig is linked and you changed its views here |
### Changes on a linked rig
With a rig linked, you can still edit the views on one asset. Your edits stay local to that asset until you choose **Apply Changes**:
* A **blue bar** at the left of a view marks a view that differs from the rig. The **Label** or **Rotation** caption turns bold when that value differs.
* Changing a label or rotation keeps the rest of the view linked: if someone later changes the rig, this asset keeps your value and takes the rest.
* Adding, removing or reordering views, including with **Add Directions**, makes the whole list local, and every view gets the blue bar. The Camera Rig asset itself doesn't change. Choose **Apply Changes** to share the new list, or **Revert Changes** to follow the rig again.
The blue bar only appears while a rig is linked. Without a rig, the views are simply the asset's own.
### Edit a Camera Rig asset
Select a Camera Rig asset to edit it in the Inspector. It has the same **Views** list as a Pixelate Asset, with **Add Directions**, **+**, **−** and drag to reorder, and the same warning for duplicate names. Changes reach every Pixelate Asset that links the rig, except values those assets changed locally.
Create a new rig with **Assets > Create > Pixelate > Pixelate Camera Rig**. It starts with one **Front** view. You can also create one from the **Camera Rigs** tab of the [Pixelate Browser](/guides/browser), which shows every rig as a ring of its views seen from above.
## Sample Camera Rigs
The `_Samples/Camera Rigs` folder has four rigs you can link or copy:
| Rig | Views |
| - | - |
| **CamRig\_Front** | Front: 0, 180, 0 |
| **CamRig\_Sidescroller** | Right: 0, 270, 0 · Left: 0, 90, 0. The **UnityChan** sample uses it. |
| **CamRig\_TopDown8** | S, SW, W, NW, N, NE, E, SE at X 30 |
| **CamRig\_TopDownAngled** | Front, Left, Back, Right at X 45 (Y 180, 90, 0, 270) |
Copy a sample rig into your own folders before you link it in a real project, so your assets don't depend on the `_Samples` folder.
## Default Camera Rig
To start every new Pixelate Asset with the same views, set **Default Camera Rig** under **New Pixelate Assets** in [Settings](/guides/settings). New assets link that rig and copy its views. Existing assets don't change.
## Next steps
Choose the clips each view captures.
See how views end up in file names, clips and controllers.
This documentation is built and hosted on [Mintlify](https://mintlify.com), a developer documentation platform.
## Typical setups
| Game style | Views (Label: Rotation X, Y, Z) | Notes |
| - | - | - |
| Single view (props, icons, effects) | Front: 0, 180, 0 | The default. For a prop seen from above, tilt X to 30. |
| Side-scroller | Right: 0, 270, 0 and Left: 0, 90, 0 | Same as the **CamRig\_Sidescroller** sample. To save texture memory, export only Right and flip the sprite in your game with the SpriteRenderer's **Flip X**. Keep both views if the lighting or the model isn't symmetrical. |
| Top-down, 4 directions | S: 30, 180, 0 · W: 30, 90, 0 · N: 30, 0, 0 · E: 30, 270, 0 | Set the first view's X to 30, then **Add Directions > 4 Directions** with Replace. Use X 45 to 60 for a steeper view. |
| Top-down, 8 directions | S, SW, W, NW, N, NE, E, SE at X 30; Y 180, 135, 90, 45, 0, 315, 270, 225 | Same as the **CamRig\_TopDown8** sample. |
| Isometric, 4 diagonals | SW: 30, 135, 0 · NW: 30, 45, 0 · NE: 30, 315, 0 · SE: 30, 225, 0 | X 30 gives the 2:1 look common in pixel art; use 35.26 for true isometric. For 8 directions, add the 8 Directions preset at X 30. |
## Share views with a Camera Rig asset
Views live on the Pixelate Asset by default. To use the same views on many assets, for example every 8-direction character, save them as a **Camera Rig** asset and link it. Edit the rig once and every linked asset follows.
### Link a Camera Rig
Use the **Camera Rig** field above the Views list:
* **Drag in or pick a rig** to link it. The rig's views replace the asset's views.
* **Clear the field** (select it and press **Delete**, or pick **None**) to unlink. The views stay on the asset, now as its own.
### The ⋮ menu
The **⋮** button next to the Camera Rig field has three commands:
| Command | What it does | Available |
| - | - | - |
| **Save As...** | Saves the current views as a new Camera Rig asset (named `{Asset} Camera Rig` by default, in a folder you choose) and links it. | Always |
| **Apply Changes** | Writes this asset's changed views back into the linked rig. Every asset that uses the rig gets them. | When a rig is linked and you changed its views here |
| **Revert Changes** | Throws away this asset's changes and returns to the rig's views. | When a rig is linked and you changed its views here |
### Changes on a linked rig
With a rig linked, you can still edit the views on one asset. Your edits stay local to that asset until you choose **Apply Changes**:
* A **blue bar** at the left of a view marks a view that differs from the rig. The **Label** or **Rotation** caption turns bold when that value differs.
* Changing a label or rotation keeps the rest of the view linked: if someone later changes the rig, this asset keeps your value and takes the rest.
* Adding, removing or reordering views, including with **Add Directions**, makes the whole list local, and every view gets the blue bar. The Camera Rig asset itself doesn't change. Choose **Apply Changes** to share the new list, or **Revert Changes** to follow the rig again.
The blue bar only appears while a rig is linked. Without a rig, the views are simply the asset's own.
### Edit a Camera Rig asset
Select a Camera Rig asset to edit it in the Inspector. It has the same **Views** list as a Pixelate Asset, with **Add Directions**, **+**, **−** and drag to reorder, and the same warning for duplicate names. Changes reach every Pixelate Asset that links the rig, except values those assets changed locally.
Create a new rig with **Assets > Create > Pixelate > Pixelate Camera Rig**. It starts with one **Front** view. You can also create one from the **Camera Rigs** tab of the [Pixelate Browser](/guides/browser), which shows every rig as a ring of its views seen from above.
## Sample Camera Rigs
The `_Samples/Camera Rigs` folder has four rigs you can link or copy:
| Rig | Views |
| - | - |
| **CamRig\_Front** | Front: 0, 180, 0 |
| **CamRig\_Sidescroller** | Right: 0, 270, 0 · Left: 0, 90, 0. The **UnityChan** sample uses it. |
| **CamRig\_TopDown8** | S, SW, W, NW, N, NE, E, SE at X 30 |
| **CamRig\_TopDownAngled** | Front, Left, Back, Right at X 45 (Y 180, 90, 0, 270) |
Copy a sample rig into your own folders before you link it in a real project, so your assets don't depend on the `_Samples` folder.
## Default Camera Rig
To start every new Pixelate Asset with the same views, set **Default Camera Rig** under **New Pixelate Assets** in [Settings](/guides/settings). New assets link that rig and copy its views. Existing assets don't change.
## Next steps
Choose the clips each view captures.
See how views end up in file names, clips and controllers.
This documentation is built and hosted on [Mintlify](https://mintlify.com), a developer documentation platform.